Showing posts with label Directory Sync. Show all posts

Wednesday, December 9, 2015

How to Create Exchange 2010 Shared Mailbox when in Hybrid


NOTE: The shared mailboxes in the cloud will not require an O365 license as of now. So it is worthwhile to utilize the feature whenever possible.

Step – 1 >> Create a User Mailbox

Login in to one of the on premise Exchange server and open EMC

clip_image002

Navigate to ‘New mailbox’ under ‘Recipient Configuration‘

clip_image004

Select ‘User Mailbox’

clip_image006

Click on ‘New User’ and fill the user information

clip_image008

Click on ‘Next’ and select the ‘Mailbox Database’

clip_image010

Select ‘Don’t create an archive’

clip_image012

Click ‘Next’ to continue and Click ‘New’ in the next screen

clip_image013

Click ‘Finish’ to create the mailbox

clip_image014

clip_image016

Power Shell Command – Makes much easier to create mailbox without many clicks, you’ll be prompted for the Password.
New-Mailbox -Name 'ThinkTel Monitor' -Alias 'ThinkTelMonitor' -UserPrincipalName 'ThinkTelMonitor@xxxxxx.com' -SamAccountName 'ThinkTelMonitor' -FirstName 'ThinkTel' -LastName 'Monitor' -Database 'Exchange2010NSL'

Step – 2 >> Start the DirSync

a. In Active Directory Sites and Services, force replication across all sites if you have multiple AD sites.
b. From the DirSync server, force online synchronization. From an elevated Command Prompt, run DirSyncConfigShell.psc1 (from C:\Program Files\Microsoft Online Directory Sync), then type Start-OnlineCoexistenceSync.
c. Verity the Changes has been sync to Cloud.
Step – 3 >> Move on premise mailbox to the cloud
Select the Mailbox and Click on ‘New Remote Move Request’

clip_image018

Click on ‘Next’ to continue the wizard

clip_image020

Provide Proxy Server FQDN of Source\Internal
Provide Exchange admin Credentials and click on ‘Next’

clip_image022

Provide Target Delivery Domain FQDN and Click Next

clip_image024

Click ‘Next‘

clip_image026

Provide Cloud credentials and click ‘OK’

clip_image027

Click ‘Finish’ to start the move process.

clip_image029

Power Shell Command – Makes much easier to create mailbox without many clicks, Open the PowerShell ISE or shell

1. Run Windows PowerShell as Admin
2. $Cred=Get-Credential (cloud admin)
3. $Session = New-PSSession -ConfigurationName Microsoft.Exchange -ConnectionUri
https://ps.outlook.com/powershell/ -Credential $Cred -Authentication Basic -AllowRedirection
4. Import-PSSession $Session
5. $RemoteCredential=Get-Credential (on-premises admin)
6. Run New-MoveRequest with the required switches (check the log for the failed move):

Examples:
New-MoveRequest -Identity ‘ThinkTellMonitor’ -Remote -RemoteHostName exchservice.xxxxxxxx.com -TargetDeliveryDomain service.xxxxxxx.com -RemoteCredential $RemoteCredential -BadItemLimit 5 -LargeItemLimit 5
7. When finished, disconnect the session by typing Remove-PSSession $Session
Click on Move Request under Cloud Connection and monitor the progress.

clip_image031

Step – 4 >> Log in to Office 365 Portal and navigate to Admin

clip_image033

a. Click on Exchange and open recipient’s window search for ‘Think………’ Mailbox
b. From the right hand side pane Click on Convert to Shared Mailbox

clip_image035

In the warning window click ‘Yes’ to continue

clip_image036

Click Close to complete.

clip_image037

Navigate to ‘Shared’ and now you should be able to see the new mailbox ‘Think………’

clip_image039

Thanks
@Roshan

Wednesday, December 2, 2015

Filter Objects in Directory Sync with Cloud

Steps to Migration On-premise DLs to Cloud


Problem statement: You have all your DLs in the on premise all users in the cloud. DLs owners in the cloud could not manage the members. (Add or remove)
Solution: Migrate DLs to the cloud while assuring minimum impact to the mail delivery.

Step – 1 >> Export all on premise DLs using a script to .CSV file
Export the list of on premise DLs to .CSV file with (DL name, email address, owners, members etc.) You can use a PS script for that. Or if you have few users you can do it manually as well.
Step – 2 >> Create a new DL on premise
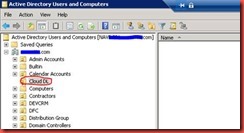
Create a new OU in on premise AD "Cloud DL" which I created or you could use an existing one.
clip_image004
Step - 3 >> Move DLs
Move all DLs to the OU which you need to migrate to the cloud (Example: Cloud OU)
Step – 4 >> Open Synchronization Service Manger
Log on to Dir-Sync Server and open miisclient.exe (Synchronization Service Manger) from the "C:\Program Files\Windows Azure Active Directory Sync\SYNCBUS\Synchronization Service\UIShell"
clip_image006
Click on Management Agents >> Double click on Active Directory Connector >> Click on Configure Directory Partitions clip_image007
clip_image009
(Make sure the correct Domain is selected at top) >> Click on Containers
clip_image010
>> Provide domain admin username and PWD >> Click OK
clip_image011
>> Uncheck the Filtered OU Example “Cloud DL” >> Click OK >> OK
clip_image013
Step – 5 >> Run full Sync
Right click >> Active Directory Connector >> Run >> Full Import Full Sync >> OK
clip_image015
Step – 6 >> Logon to Cloud admin page
You need to login to O365 admin portal and navigate to Admin >> Exchange. Click on “Groups” search for DLs which was moved to Filtered OU in Step - 3
clip_image017
You should not see any DLs here, if you still see DLs sometimes this might take 30 minutes or so according to my experience and also will depend your AD site and links.
Step – 7 >> Create DLs on the cloud
Click on + select Distribution group >>
clip_image018
Type the Exact Name, Alias and email address as your on premise DL
clip_image020
Add the owner and members to it and click on SAVE.
clip_image022
Select the DL and click on Delivery Management and change senders option
clip_image024
To create DLs in the cloud you can use PowerShell script as well.
Step – 8 >> Remove the on premise DLs
Login to AD navigate to OU “Cloud DL” and delete DLs that you have already created in the cloud.
NOTE: If you do not delete the on premise DLs,
1) on premise users will be able to send mails to the DLs but which will make more difficult to manage basically 2 identical DLs will exists in your environment one in cloud and one in on premise
2) If you later move the DLs to any other Syncing OU in AD which will overwrite the Cloud DLs once Dir-Sync is synced.

-Thanks
@Roshan