Showing posts with label Microsoft. Show all posts

Friday, April 22, 2016

Skype for Business Certificate Expiration Issue - The Skype for Business Server Front-End service terminated with the following service-specific error:


Unable to start “Skype for Business Server Front-End service”

Event viewer:

The Skype for Business Server Front-End service terminated with the following service-specific error:
A required certificate is not within its validity period when verifying against the current system clock or the timestamp in the signed file.

Note: Before requesting a new certificate, we need to make sure that the Root CA certificate is installed in the Trusted Root Certification Authorities under the Local Computer Certificate Store:

Also please review the expired cert before starting the wizard so that you have necessary information request in the wizards, Example shows the SANs used my cert.

image

Step 1 – Login to SFB Server which the cert is expired.

Open Skype for Business 2015 – Deployment Wizard and click on Install or Update SFBS Systems

image

Click on Request, Install or Assign Certificates >> Run

image

you will see exclamation marks as shown below if the cert is not valid (in our case expired)

image

Click on Request button, it will bring  Certificate Request window, You’ll need to fill the form. It is very important to select ALL or domain for subject alternative names (My case I use my domain) Click for advance if you need to do some custom settings like ;

Create an Offline Request, Specify another CA, Specify different CA credentials, Use a different Certificate Template, Change key bit length and/or Mark the certificate private key as exportable and Add additional SAN names. After that, we will return to the initial Certificate Request screen

image

Review the summery if all good click on Next.

image

If the certificate request is successful, we get Task status: Completed:, for more information you can view the view log.

image

This will open the Certificate Assign wizard click on Finish

image

Before assignment check and validate the cert by View Certificate Details

image

Click on Next

image

If the certificate assignment successful you see tick marks as below.

image

Congratulation ! now you have reconfigured the cert successfully, recommend a server restart but not mandatory now you can start services manually

@roshan-

Tuesday, December 8, 2015

Disable / Junk mail, read receipts, recoverable items and automatic processing O365

 
Disabling read receipts for Microsoft Office 365 mailbox
1. Log in into Microsoft Office 365 using the journal mailbox user account.
2. Go to Outlook tab.
3. Select Settings
image icon then click Options.
4. Expand the MAIL section and click on Read receipts
5. Select Never send a response
6. Click on SAVE to save changes

image
Disable Junk Mail Options
1. Log in into Microsoft Office 365 using the journal mailbox user account.
2. Go to Outlook tab.
3. Select Settings
image icon then click Options.
4. Expand the MAIL section and Expand the Accounts
5. Click on Block or Allow and Select “Don’t move email to my junk Email folder”
6. Click on SAVE to save changes

image
Disable Automatic Processing of Calendar Items
1. Log in into Microsoft Office 365 using the journal mailbox user account.
2. Go to Outlook tab.
3. Select Settings
imageicon then click Options.
4. Expand the CALENDAR section and Click on Automatic processing
5. Un-tick  Delete invitation and responses ………… and Delete notifications about forwarded events
6. Click on SAVE to save changes

image
Disabling the Recoverable Items folder in Microsoft Office 365
You’ll need to open “Windows Azure Active Directory Module for Windows PowerShell” module
Run the following command:

1. $UserCredential = Get-Credential and key in the required credentials.
3. To start your remote session with Exchange Online, run the following command:
$Session = New-PSSession -ConfigurationName Microsoft.Exchange -ConnectionUri
https://ps.outlook.com/powershell/ –Credential $UserCredential -Authentication Basic -AllowRedirection
4. Run the following command: Import-PSSession $Session
5. To disable the Recoverable Items folder functionality, run the following command: Set-Mailbox –Identity journal –SingleItemRecoveryEnabled $False –RetainDeletedItemsFor 0
6. To disconnect your session, run the following command: Remove-PSSession $Session


-Thanks
@ Roshan


Wednesday, December 2, 2015

Filter Objects in Directory Sync with Cloud

Steps to Migration On-premise DLs to Cloud


Problem statement: You have all your DLs in the on premise all users in the cloud. DLs owners in the cloud could not manage the members. (Add or remove)
Solution: Migrate DLs to the cloud while assuring minimum impact to the mail delivery.

Step – 1 >> Export all on premise DLs using a script to .CSV file
Export the list of on premise DLs to .CSV file with (DL name, email address, owners, members etc.) You can use a PS script for that. Or if you have few users you can do it manually as well.
Step – 2 >> Create a new DL on premise
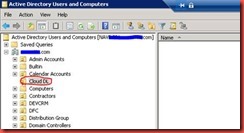
Create a new OU in on premise AD "Cloud DL" which I created or you could use an existing one.
clip_image004
Step - 3 >> Move DLs
Move all DLs to the OU which you need to migrate to the cloud (Example: Cloud OU)
Step – 4 >> Open Synchronization Service Manger
Log on to Dir-Sync Server and open miisclient.exe (Synchronization Service Manger) from the "C:\Program Files\Windows Azure Active Directory Sync\SYNCBUS\Synchronization Service\UIShell"
clip_image006
Click on Management Agents >> Double click on Active Directory Connector >> Click on Configure Directory Partitions clip_image007
clip_image009
(Make sure the correct Domain is selected at top) >> Click on Containers
clip_image010
>> Provide domain admin username and PWD >> Click OK
clip_image011
>> Uncheck the Filtered OU Example “Cloud DL” >> Click OK >> OK
clip_image013
Step – 5 >> Run full Sync
Right click >> Active Directory Connector >> Run >> Full Import Full Sync >> OK
clip_image015
Step – 6 >> Logon to Cloud admin page
You need to login to O365 admin portal and navigate to Admin >> Exchange. Click on “Groups” search for DLs which was moved to Filtered OU in Step - 3
clip_image017
You should not see any DLs here, if you still see DLs sometimes this might take 30 minutes or so according to my experience and also will depend your AD site and links.
Step – 7 >> Create DLs on the cloud
Click on + select Distribution group >>
clip_image018
Type the Exact Name, Alias and email address as your on premise DL
clip_image020
Add the owner and members to it and click on SAVE.
clip_image022
Select the DL and click on Delivery Management and change senders option
clip_image024
To create DLs in the cloud you can use PowerShell script as well.
Step – 8 >> Remove the on premise DLs
Login to AD navigate to OU “Cloud DL” and delete DLs that you have already created in the cloud.
NOTE: If you do not delete the on premise DLs,
1) on premise users will be able to send mails to the DLs but which will make more difficult to manage basically 2 identical DLs will exists in your environment one in cloud and one in on premise
2) If you later move the DLs to any other Syncing OU in AD which will overwrite the Cloud DLs once Dir-Sync is synced.

-Thanks
@Roshan


Thursday, July 24, 2014

LYNC Click to CALL, Lync Add-on, Lync Call, Lync Call using IE

What is Click to Call?

Click to call is an add-on for Internet explorer which enables Lync to identify phone numbers in websites and make calls by simply clicking on the phone number.

Prerequisites

Lync infrastructure \ Lync Client 2010\2013

Internet Explorer Latest


Enable ad-Ons

Open >> IE >> Internet Options >> Programs >> Add-on Types (Toolbars and Extensions) >> Enable

·         Lync Browser Helper

·         Lync Click to Call

Enable Number Detection by Click the Icon below and select “Enable number detection”

Or you can use

Tools >> click “Lync Click to Call”

Click on Lync icon to make calls

Lync client will open and click on dial to make the call

Roshan